Umbraco Deployment with AppVeyor
Hi, and welcome to this guest post on codeshare.co.uk. My name is Steven and in this guide I'll be walking you through how to set up AppVeyor for continuous delivery of an Umbraco site. Although I’m using Umbraco as an example the steps can be applied to any ASP.NET web application.
What is AppVeyor?
AppVeyor is a cloud-based continuous delivery service for .NET applications. It works by hooking into your source code repository and when it detects a change (i.e., commit), pulls down your code and compiles it. It can also run tests and deploy your application, and will notify you of any errors.
Using AppVeyor (or any build server) is good practice because it ensures that what is getting checked into your repository will build on another machine. It’s like a health monitor for your application.
Before we begin
I'm going to assume you already have an Umbraco project set up and under version control. AppVeyor supports Git, Mercurial, and Subversion. The repo I've used for this tutorial is up on GitHub. There's nothing special about it, however, it's a clean Umbraco 7.6 install with the Overflow starter kit.
You’ll also need somewhere to deploy your site. AppVeyor supports deployment using Microsoft Web Deploy. I’ll touch briefly on how to obtain publish profiles for Azure Web Apps and sites in IIS, however web server setup and configuration is beyond the scope of this tutorial.
Finally I should point out that this guide only covers deployment of the web application itself and isn’t concerned with deployment of the database, document types, content, and so on.
Create the AppVeyor project
If you haven't done already then head over to AppVeyor.com and create an account. On the projects page select “New project”:

If you logged into AppVeyor with your GitHub account like me you’ll see a list of your repositories. Hover over your Umbraco repo and click “Add”:
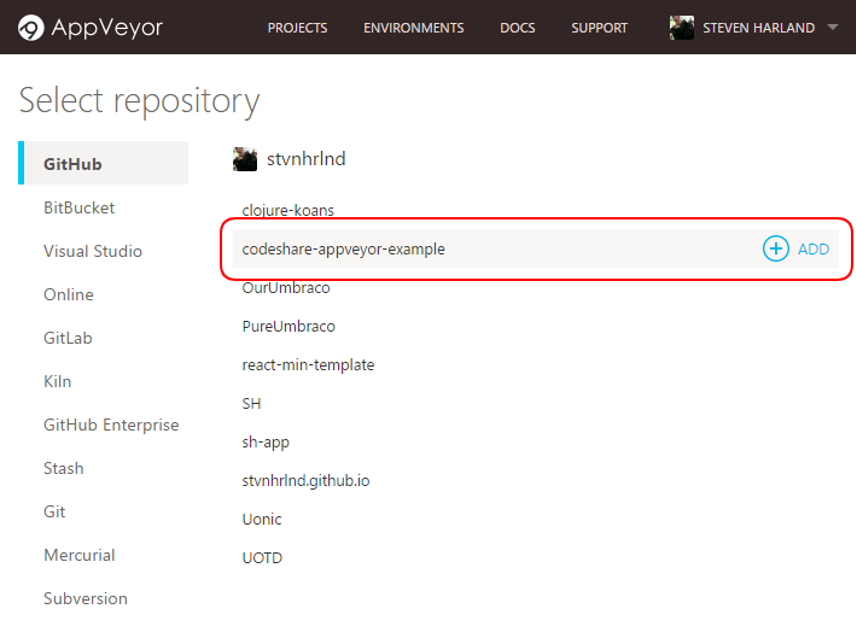

It’s telling us to commit a change to the repository so let’s do that.
Add the appveyor.yml to your repo
In the root folder of your solution create a file called appveyor.yml with the following content:
version: 1.0.0-{build}
configuration: Release
cache:
    - packages -> **\packages.config
before_build: nuget restore
build:
    publish_wap: true
This file contains instructions for AppVeyor about how to build your project. Don’t worry about the details for now. Push this up to your repo and head over to AppVeyor and you should see that it has started to build your project:
Hopefully your build is a success. If not then the console output will help you to track down any errors.
What’s going on in appveyor.yml?
Let’s go through it line by line.
version: 1.0.0-{build}As you might have guessed this is a version number for your application. AppVeyor will replace {build} with an integer that it increments on each build:
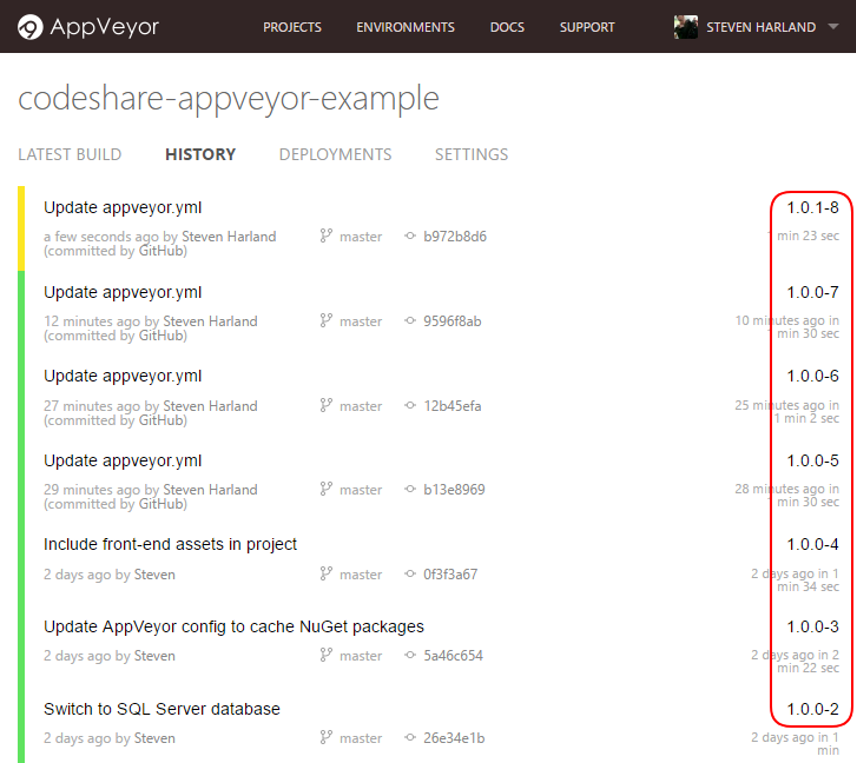
The format of the version number is entirely up to you.
configuration: ReleaseThis line tells AppVeyor to build the application in release mode. By default it will build in debug which is probably not what you want if you’re deploying to a production environment. Note that building in release will mean the release config transform is applied when publishing web applications.
cache:

 - packages -> **\packages.config
Here we tell AppVeyor to preserve the packages directory between builds. Without this NuGet packages will be downloaded on every build, so this speeds things up a little. If any packages.config file in your solution changes (meaning a package has been added or removed) then the cache is invalidated and the packages are downloaded again.
before_build:

nuget restore
AppVeyor supports running commands and scripts at various stages of the build. Here we’re just restoring the NuGet packages required by our application. Without this the build will surely fail (unless for some reason your packages folder has been committed).
build:

publish_wap: true
This tells AppVeyor to create Web Deploy packages for the web applications in your solution. You can see these in the Artifacts tab of the build:
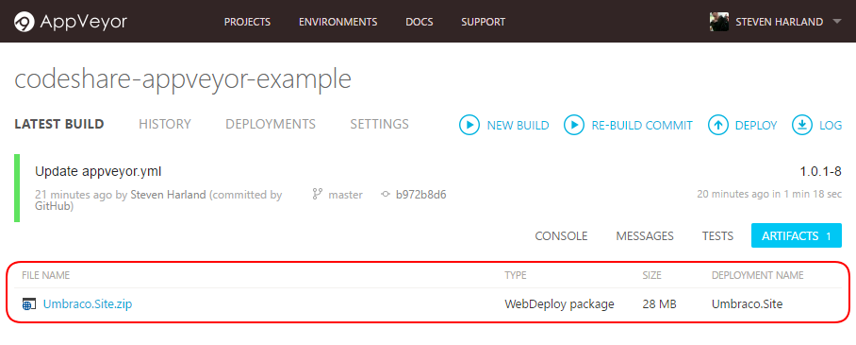
Take note of the filename as you’ll need it shortly.
Obtain a publish profile
So now that AppVeyor is building and packaging up your site it’s time to look at deployment. In order to deploy via Web Deploy you will need to obtain a publish profile from your hosting provider (or from IIS if you have your own server).
Azure Web App
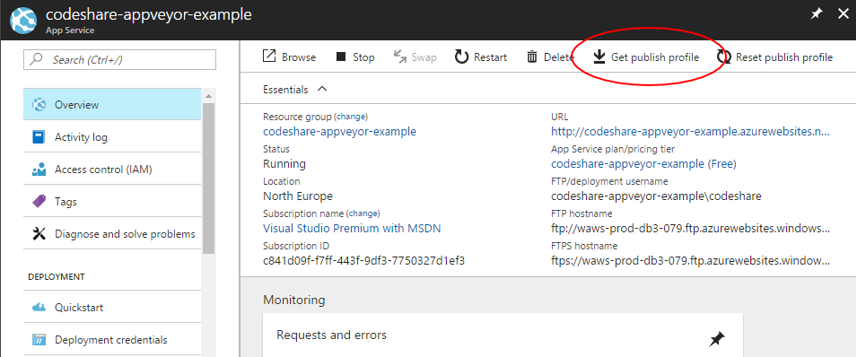
If you’re using an Azure Web App you can download a publish profile for it directly from the Azure portal:
IIS
In IIS you can get a publish profile for a site by right clicking on it and selecting Deploy → Configure Web Deploy publishing:
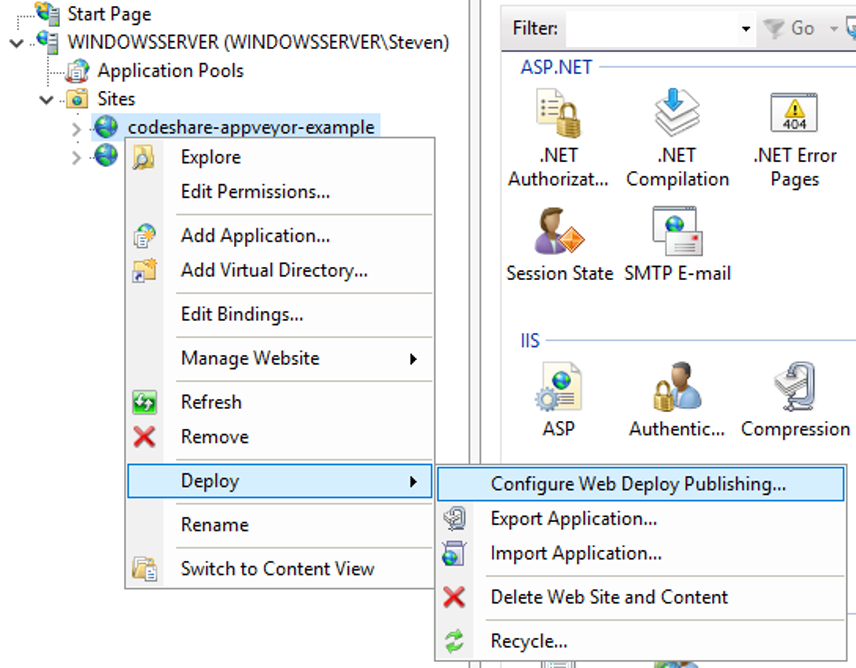
If you don’t see this option then you don’t have Web Deploy installed. See this guide for instructions on how to set this up.
In the Window that appears select a Windows user to enable publishing for (you will need to know the password for this user) and click “Setup”:
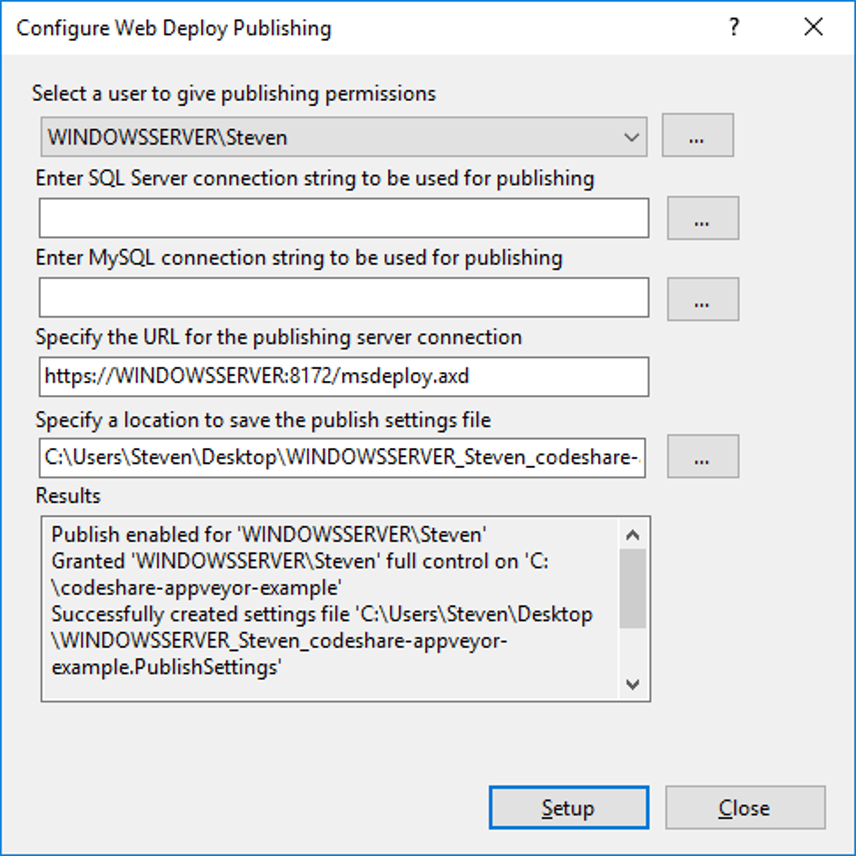
The publish profile will be saved to the location specified.
Create the AppVeyor environment
Head back over to the AppVeyor environments page and select “New environment”:

Select “Web Deploy” for the deployment provider and you’ll see the following settings appear:
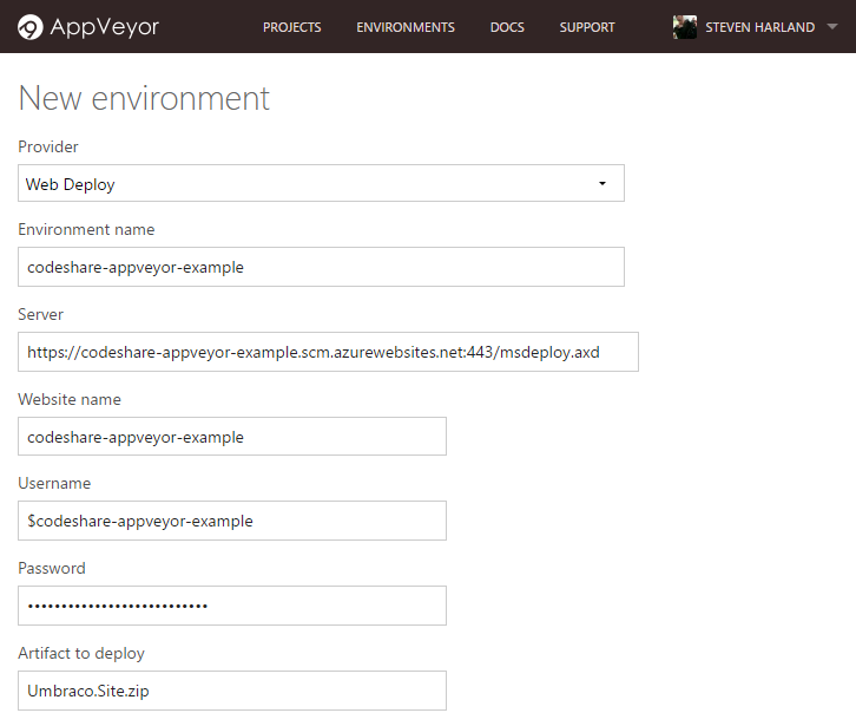
The environment name can be whatever you like. The server, website name, username, and password can be obtained from the publish profile (which is just XML so you can open it with a text editor). Here’s a snippet of the one I downloaded from my Azure Web App:
<publishProfile
   profileName="codeshare-appveyor-example - Web Deploy"
   publishMethod="MSDeploy"
<mark>   publishUrl="codeshare-appveyor-example.scm.azurewebsites.net:443"
   msdeploySite="codeshare-appveyor-example"
   userName="$codeshare-appveyor-example"
   userPWD="[REMOVED]" </mark>
   destinationAppUrl="http://codeshare-appveyor-example.azurewebsites.net"
   SQLServerDBConnectionString=""
   mySQLDBConnectionString=""
   hostingProviderForumLink=""
   controlPanelLink=""
   webSystem="WebSites">
   <databases />
</publishProfile>
You can simply copy these settings over to your environment. However, you will need to modify the publishUrl slightly, adding https:// and /msdeploy.axd to the beginning and end so that for example, codeshare-appveyor-example.scm.azurewebsites.net:443 becomes https://codeshare-appveyor-example.scm.azurewebsites.net:443/msdeploy.axd.
If you got your publish profile from IIS then it might be slightly different:
<publishProfile
  publishUrl="https://WINDOWSSERVER:8172/msdeploy.axd"
  msdeploySite="codeshare-appveyor-example"
  destinationAppUrl="http://codeshare-appveyor-example.northeurope.cloudapp.azure.com:80/"
  mySQLDBConnectionString=""
  SQLServerDBConnectionString=""
  profileName="Default Settings"
  publishMethod="MSDeploy"
  userName="WINDOWSSERVER\Steven" />
In this case you will need to replace the computer name in publishUrl with your public IP address or hostname so https://WINDOWSSERVER:8172/msdeploy.axd would become https://codeshare-appveyor-example.northeurope.cloudapp.azure.com:8172/msdeploy.axd. Also note that this one doesn’t include the password.
Finally you need to specify the artifact to deploy. This is the name Web Deploy package that was created earlier as part of the build, in my case Umbraco.Site.zip. You can leave the other environment settings as-is for now.
Deploy
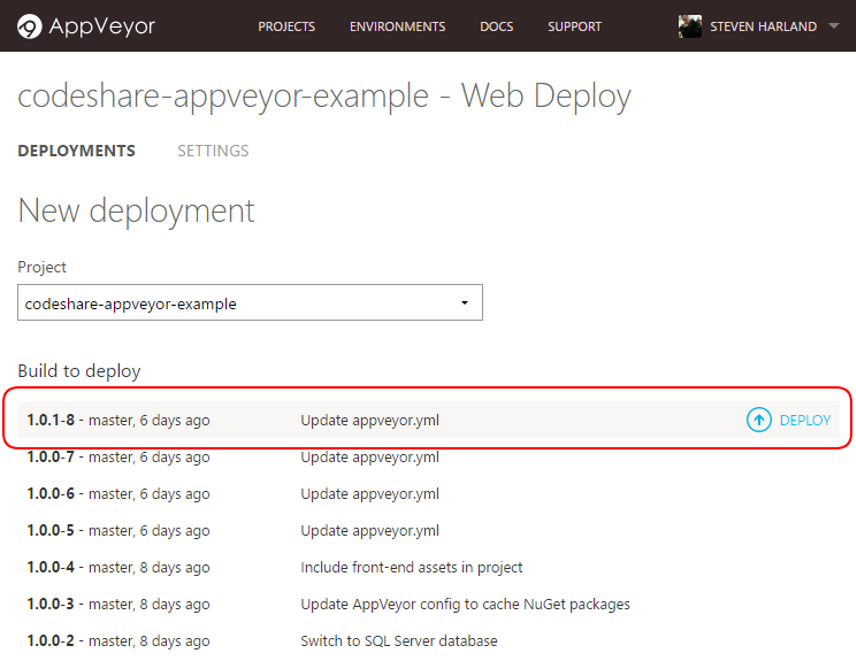
There are couple of ways to deploy using the AppVeyor web interface. The first is via the environment page by selecting “New deployment”:
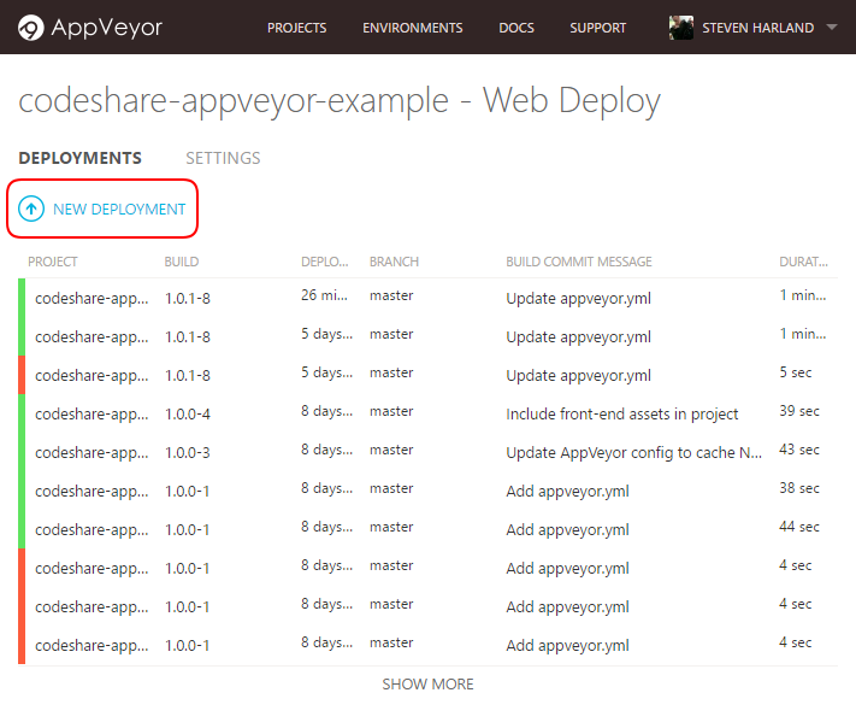
You’ll then be able to select a project and a build to deploy:
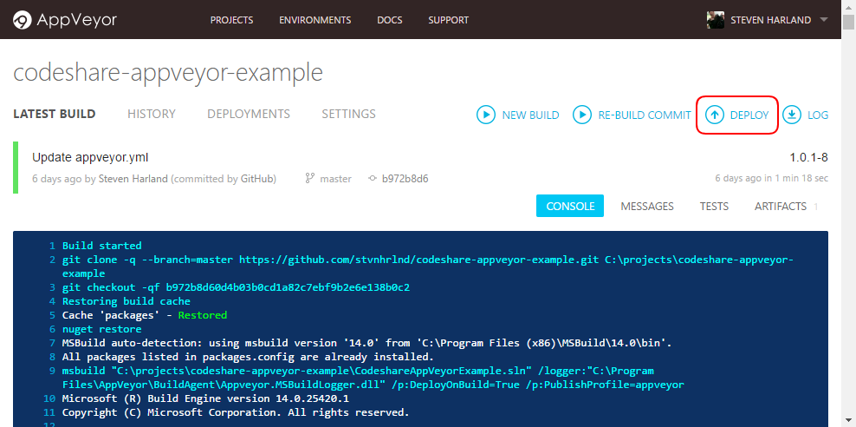
Alternatively you can deploy from the build itself by selecting “Deploy” on the build page:
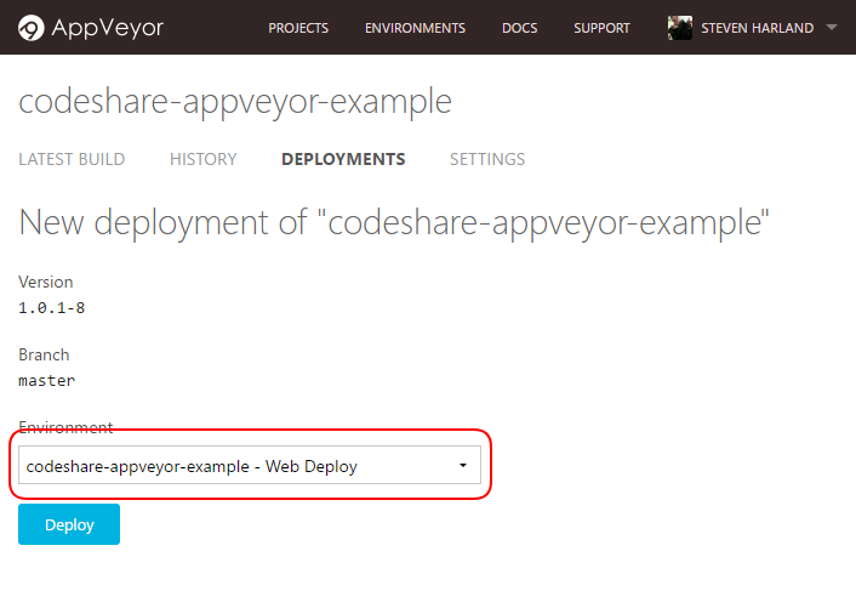
Then you select an environment to deploy to:
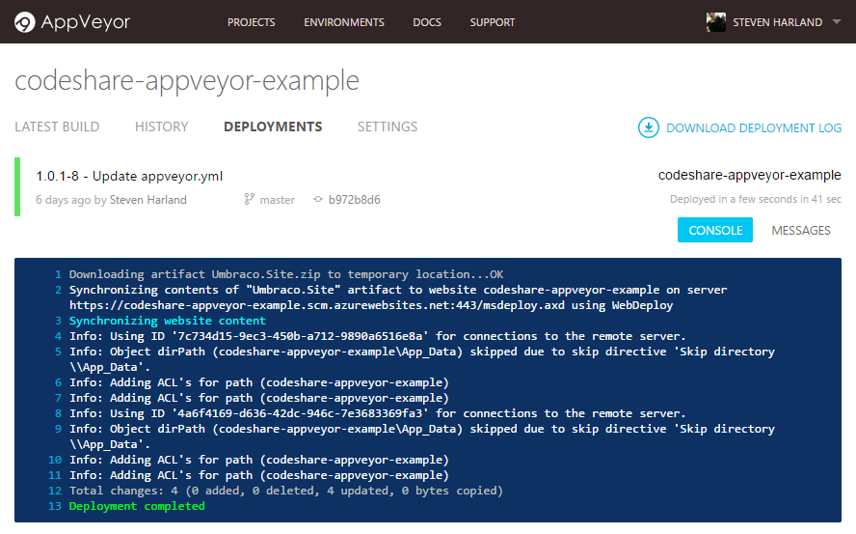
Whichever way you decide to do it you’ll end up on the deployment page and with a bit of luck your application will be successfully pushed up to the server:
Continuous deployment
Perhaps this is too many clicks for you. Say you don’t even want to log in to AppVeyor to deploy. Well, you can get AppVeyor to automatically deploy your changes for you whenever you push up your changes. Add the following code to the end of your appveyor.yml to automatically deploy the master branch (replace the name with your own environment name):
deploy:
 provider: Environment
 name: codeshare-appveyor-example
 on:
   branch: master
Or, to deploy when you create a tag (GitHub, GitLab, and BitBucket only):
deploy:
 provider: Environment
 name: codeshare-appveyor-example
 on:
   appveyor_repo_tag: true
Web Deploy parameters
When deploying to different environments you’re going to want to change certain configuration settings. Connection strings, for example, will be different between dev, UAT, and live environments. This is achieved using Web Deploy parameters.
To demonstrate I’ve added the following app setting into my Web.config:
<add key="currentEnvironment" value="Development"/>And rendered it out on the home page as follows:
<p>Environment: @System.Configuration.ConfigurationManager.AppSettings["currentEnvironment"]</p>In order to have this value swapped out on deployment we need to do 2 things. First, add a parameters.xml file to the root of your web project:
<?xml version="1.0" encoding="utf-8" ?>
<parameters>
 <parameter name="currentEnvironment"
            defaultValue="Unknown">
   <parameterEntry kind="XmlFile"
                   scope="\\web.config$"
                   match="/configuration/appSettings/add[@key='currentEnvironment']/@value" />
 </parameter>
</parameters>
This file specifies the parameters that are eligible for replacement. In this example we are replacing an app setting in the Web.config file. As this is an XML file the parameter is matched using an XPath expression.
The parameters.xml file determines what can be replaced but it doesn’t specify the values to use. The second step is to add the values as environment variables in the environment settings:
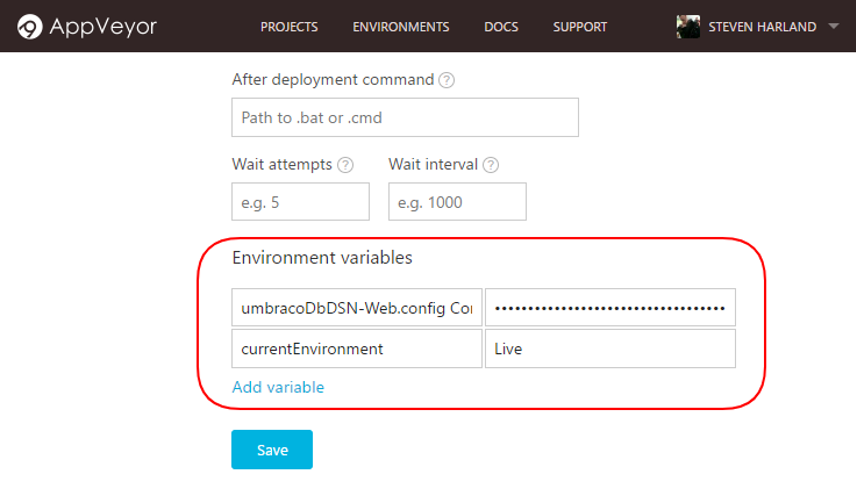
The name here must match the name in the parameters.xml (which can be different from the name of the app setting).
Now when I deploy my app it will swap “Development” for “Live”.
Connection strings
You may have noticed in the previous screenshot that I’ve also added an environment variable for the umbracoDbDSN connection string. However, this is not defined as a parameter in my parameters.xml. This is because connection strings are automatically added to the parameters.xml when the application is built. You can see this if you download and unzip the Web Deploy package from the Artifacts tab of your build:
<parameter name="umbracoDbDSN-Web.config Connection String" description="umbracoDbDSN Connection String used in web.config by the application to access the database." defaultValue="" tags="SqlConnectionString">
   <parameterEntry kind="XmlFile" scope="C:\\projects\\codeshare-appveyor-example\\Umbraco\.Site\\obj\\Release\\Package\\PackageTmp\\Web\.config$" match="/configuration/connectionStrings/add[@name='umbracoDbDSN']/@connectionString" />
 </parameter>
Note that the parameter name is the connection string name with the following suffix: "-Web.config Connection String".
Conclusion
The AppVeyor setup I've presented in this article is very basic but it should be enough to get your project started. AppVeyor is highly configurable and there are many other ways to use it, not limited to web applications. Head over to the documentation and check it out.
If you have any questions or comments then don't hesitate to get in touch - I'm usually available on the Umbraco Community Slack. Thanks for reading!